
1 of 1
Animation generating…
Your animation is being created. It’ll appear here automatically when it’s ready.
Description
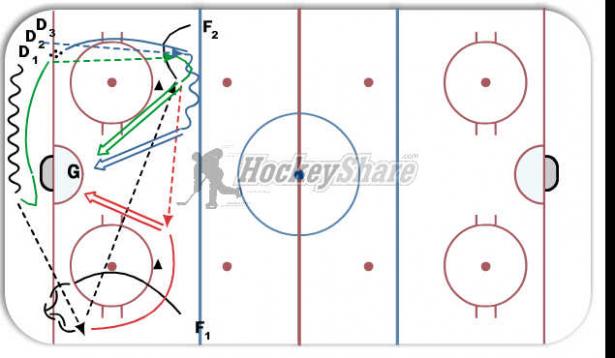
This drill has 4 phases in this order: Black - Red - Green - Blue
Black Phase:
F1 comes down for a low breakout pass from D1
F1 passes across to F2
Red Phase
F1 skates up around pylon for return pass from F2
F1 shoots on net
F1 goes hard to net to set up screen for upcoming shot from F2
Green Phase
After b/o pass to F1, D1 returns to corner and makes pass to F2
F2 pulls puck around pylon and shoots. F1 screens and deflects.
F2 goes to net to set up screen for upcoming shot from D1
Blue Phase
After pass to F2, D1 skates to point and receives pass from D2
D2 carries puck around pylon, or drags if right hand shot and shoots on net.
F2 is screening/deflecting
F1 moves to backdoor for slap-pass from D1
After sequence, F1 and F2 switch lines, and D2 starts sequence again
Drill can run from both ends
Key Points
Tape to Tape Passes
Good Shots
Get to Net
Effective Screen
Keep point shots low